Interactive Prenatal Development Timeline - How do I use it?
 This interactive timeline allows you to create a vertical chronology of prenatal development events filled with associated facts, movies, and quizzes focused on the development of human life from conception until birth. Options for customizing your timeline include Level of Difficulty (Beginner, Intermediate, Advanced, or All), 16 Body Systems/Regions, Footnotes, Bibliography, and English/Spanish text listing development events.
The Interactive Prenatal Development Timeline is divided into 18 units: the first 12 units account for the first 12 weeks of development, and the last 6 account for each of the last 6 months of development. Each unit includes an Event Box filled with development events and links to movie clips, labeled images, and text- and image-based quizzes.
Choosing Interactive Prenatal Timeline, from the Science section of the site menu, produces a default display of an Intermediate timeline showing all body systems and regions. To see the default timelines for other levels of difficulty, select from the site menu Science>Interactive Prenatal Timeline>Beginner, or >Intermediate, or >Advanced, or >All.
Once you have selected any of these default timelines, you can begin to customize it to suit your study needs. The interactive timeline can at first glance seem overwhelming. However, reading the pointers below will prepare you to navigate this huge resource with ease.
TIMELINE OPTIONS
Refresh Page
 When you are finished selecting one or more of the timeline options described below, click the Refresh Page button on the right side of the page above the timeline to regenerate the page with your chosen options activated. This button (shown on the right) is located directly to the right of the More Options/ Less Options buttons. Those options requiring selection of the Refresh Page button for activation are: the Body System(s)/Region(s) Selection Menu, the Show Footnotes checkbox, the Show Bibliography checkbox, and the Page Language and Additional Language drop-down menus.
Level of Difficulty

The complexity of timeline content is determined by the Level of Difficulty button you select. If you want facts and quizzes only for beginners, click the Beginner button. You can do likewise for both the Intermediate and Advanced buttons. If you want all of the facts displayed for all levels of difficulty, click the All button. If you choose to not select any other options for your timeline, click the Refresh Page button on the right side of the page (just below the Body Systems/Regions Selection Menu buttons). This will reproduce the timeline for your chosen Level of Difficulty.
BODY SYSTEMS/REGIONS SELECTION MENU
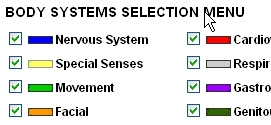 Limit the development events displayed on your timeline to a particular body systems or regions by clicking the appropriate boxes in the Body Systems/Regions Selection Menu (shown on the right). All of the systems and regions are selected by default. To see facts only about the nervous system, for example, uncheck all other systems and regions, then click the Refresh Page button on the right below this selection menu. The units on the refreshed timeline page will then then display facts related only to the nervous system. Checking multiple boxes shows development events on the timeline related to those systems and regions selected.
Select/Clear All
 Select or deselect all of the Body Systems/Regions Selection Menu boxes at once by checking the Select/Clear All checkbox (shown at left). This checkbox toggles between selecting all systems/regions and deselecting all systems/regions. (Sometimes it's easier to select the few you want rather than deselect the many you don’t want.) Once you are finished with your selections, click the Refresh Page button below the Body Systems/Regions Selection Menu. This will reproduce the timeline according to your chosen options.
Expand/Collapse Boxes
 The Event Box in each unit has a standard size, limiting the number of development events displayed in the default view. A More Events... link appearing after the last development event indicates that more development events in that Event Box are available for viewing. To expand or collapse all Event Boxes on the timeline simultaneously, click the Expand/Collapse Boxes checkbox (shown to the right), located just above the Body Systems/Regions Selection Menu. To display all development events within the Event Box of a single unit, click the More Events link in that box to expand it. Once clicked, the More Events link changes to Less Events..., which when selected collapses the box to standard size and hides those development events not included in the default view.
More Options
 The options for Show Bibliography, Show Footnotes, Page Language, and Additional Language (described below) appear when you click the More Options button directly below the Body Systems/Regions Selection Menu. When this More Options button is selected, it turns into a Less Options button. These two buttons allow you to toggle between displaying and hiding the additional options.
Show Footnotes

 Produce a list of brief references, page numbers, and explanatory notes at the bottom of the timeline. Click More Options and select Show Footnotes. After selecting the Refresh Page button, superscript numbers appear after the development events listed in the Event Boxes. Click any number to go to the specific footnote for that fact at the bottom of the page (shown below). Each footnote is linked to its source in the ehd.org Bibliography.
Show Bibliography
 Produce a list of scientific references supporting the facts presented in your timeline. Click More Options and select Show Bibliography. Conduct a search of all occurrences
of a source on ehd.org by selecting the Search EHD button (shown at right).
Produce a list of scientific references supporting the facts presented in your timeline. Click More Options and select Show Bibliography. Conduct a search of all occurrences
of a source on ehd.org by selecting the Search EHD button (shown at right). Display the abstract and full reference of a particular source on the National Library of Medicine’s PubMed site by clicking the Ref. Abstract button (shown at right). If the full source text of a particular reference is available online, a Full Text button will also be displayed. Click this button to launch another browser window with the full source text.
Page Language
The timeline's default language is English. The Page Language feature allows you regenerate the timeline with the development events in Spanish. Click More Options, select the Page Language drop-down menu, and choose Spanish. If you would like to see each fact displayed in both English and Spanish, you can select one of these languages from the Page Language drop-down menu, and then choose the other from the Additional Language drop-down menu (described below). Click Refresh Page to view this change.
Additional Language
This feature allows you to read development events listed in the Event Boxes in a second language. Select either English or Spanish from the Additional Language pull-down menu, depending on which other language is selected in the Page Language option.
THE TIMELINE
Timeline Images
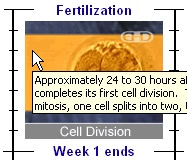 A series of images associated with the various timeline units are aligned down the center of the page (an example is shown on the left). Hold your mouse over any one of these images to prompt the display of a text box containing the narration of the BPD video describing the development time period covered by that unit of the timeline. (If the text box does not appear, you may need to click the Refresh Page button.) Click any one of these images to see the video clip from the BPD DVD in the movie gallery, which covers the development period represented in that unit of the timeline. To watch BPD video clips covering previous or succeeding development time periods, click the Previous or Next buttons below the video image.
Event Boxes
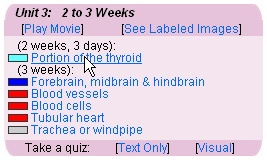 The timeline's 19 units, which represent discreet development time periods, have corresponding Event Boxes that appear down the left and right sides of the timeline. Each Event Box contains a list of development events that take place during the development time period represented by that unit.
Within each Event Box the following actions can be taken.
Link to the Prenatal Development Article

 Most of the events listed in the Event Boxes are described in EHD's online prenatal development article. Access text from this article relating to a particular development period by clicking the Unit Title (shown on the left) on the top bar of the Event Box for that period. You can also click an individual development event (shown to the right) within an Event Box to open the article at the exact location where that fact is discussed. This facilitates studying particular development time periods and their events.
Play Movie
![]() Click the Play Movie link (shown on the left) on the top bar of an Event Box to view a BPD/DVD clip from the time period described in that box. You will be taken to the Movie Gallery which will be populated with the clips that are relevant to the time period you selected in the timeline.
Click the Play Movie link (shown on the left) on the top bar of an Event Box to view a BPD/DVD clip from the time period described in that box. You will be taken to the Movie Gallery which will be populated with the clips that are relevant to the time period you selected in the timeline.
See Labeled Images
 The window containing the movie also provides buttons with which to view still images (shown on the right). Basically, to use these pop-up windows, you can click any of the thumbnails to see larger labeled and unlabeled versions of the image.
Show More Events
![]()
![]() Each Event Box has a standard size, limiting the number of development events displayed in the default view. A More Events... link appearing after the last development event of a particular Event Box list indicates that more development events in that box are available for viewing. Click the More Events link to expand the box and display all development events for that unit. Once clicked, the More Events link changes to Less Events..., which when selected collapses the box to standard size and hides those development events not included in the default view.
Each Event Box has a standard size, limiting the number of development events displayed in the default view. A More Events... link appearing after the last development event of a particular Event Box list indicates that more development events in that box are available for viewing. Click the More Events link to expand the box and display all development events for that unit. Once clicked, the More Events link changes to Less Events..., which when selected collapses the box to standard size and hides those development events not included in the default view.
To expand or collapse all Event Boxes on the timeline simultaneously, click the Expand All or Collapse Boxes checkbox (shown on the right), located on the right side of the Body System/Region Selection Menu above the timeline.
Take a Quiz
![]()

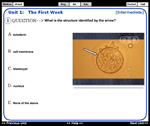 Take a text- or image-based quiz to assess your knowledge of the material presented in each unit on the timeline. Open either of these quizzes in a new browser window by clicking the Text Only and Visual links in the bottom bar of each Event Box. Each quiz reflects the Level of Difficulty selected when the timeline is generated or refreshed. Help text explaining quiz window features can be accessed through the Help link at the bottom of any quiz window.
Quick Access to Your Timeline
Bookmark Your Timeline
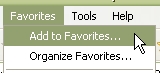 If you would like to maintain the timeline settings you have chosen, (for example, if you are a teacher and use the same timeline for each class each term), take advantage of our bookmarking feature. After choosing your timeline options and refreshing the page, select the Favorites (or Bookmarks) menu at the top of your browser window and click Add to Favorites (shown on the left). Name the page whatever you like (perhaps a name that helps you remember the settings you had selected). To access your saved timeline, select the Favorites menu in your browser and click the name you assigned to that timeline.